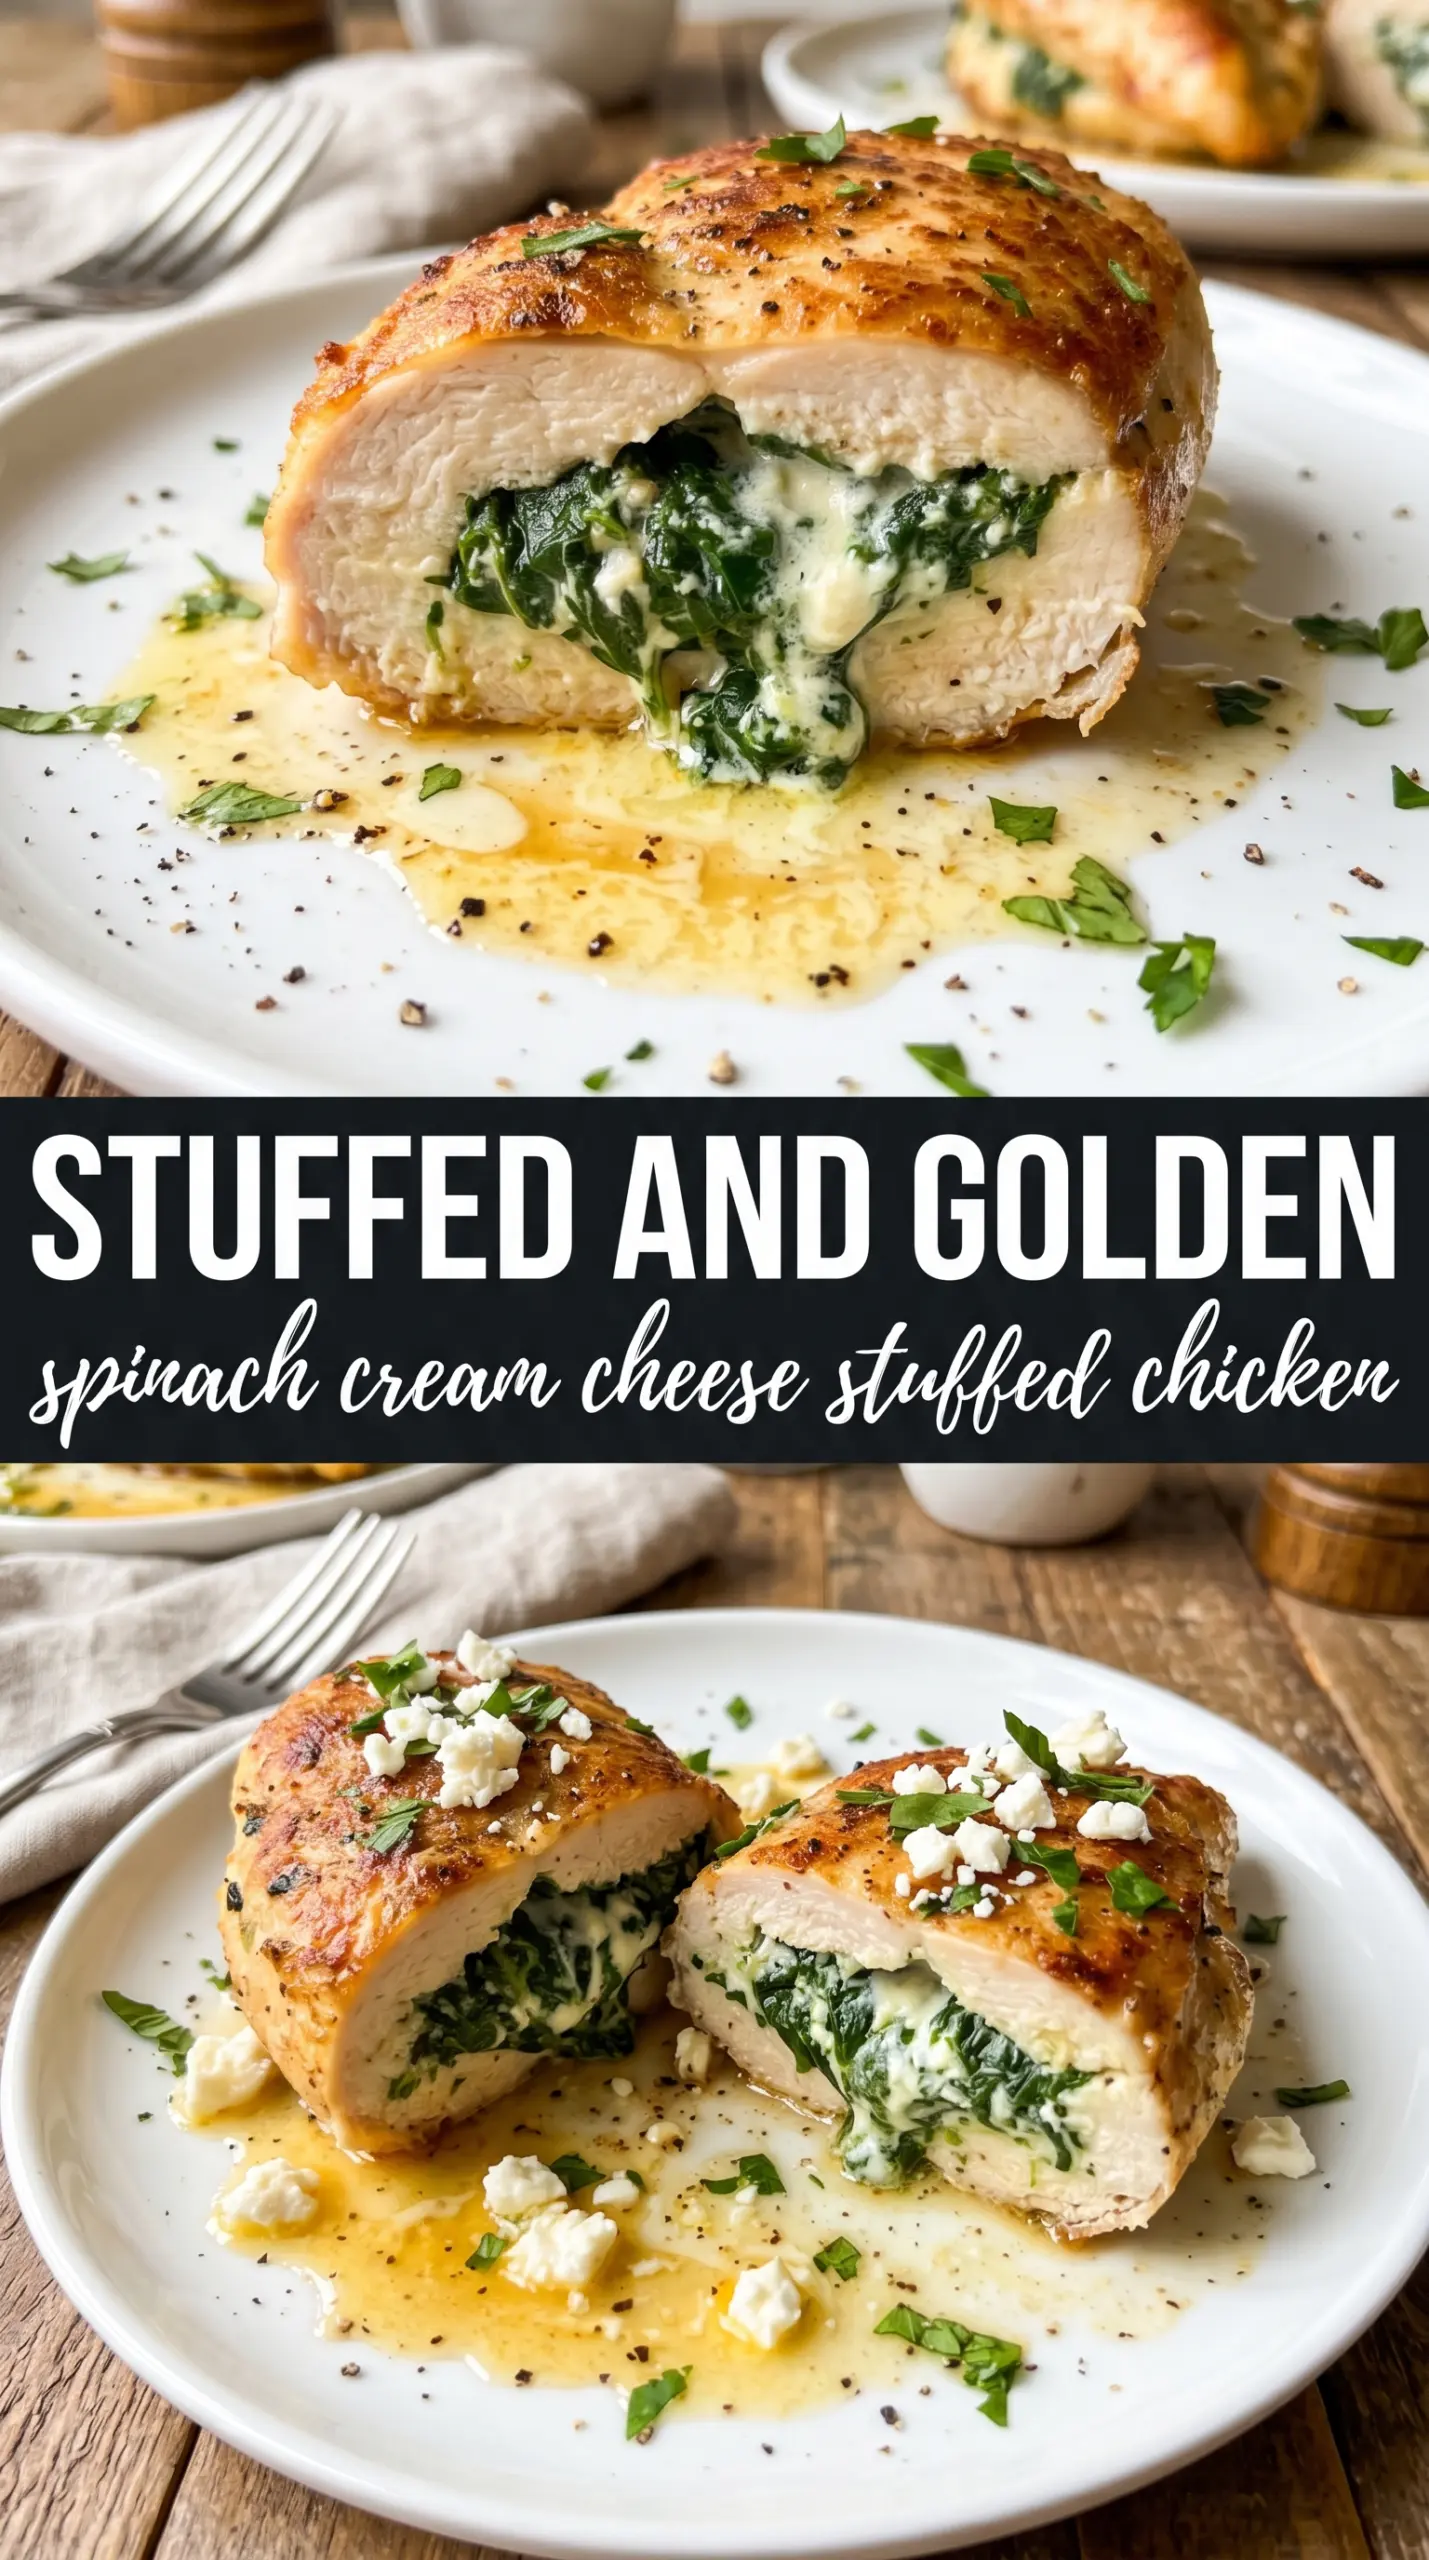
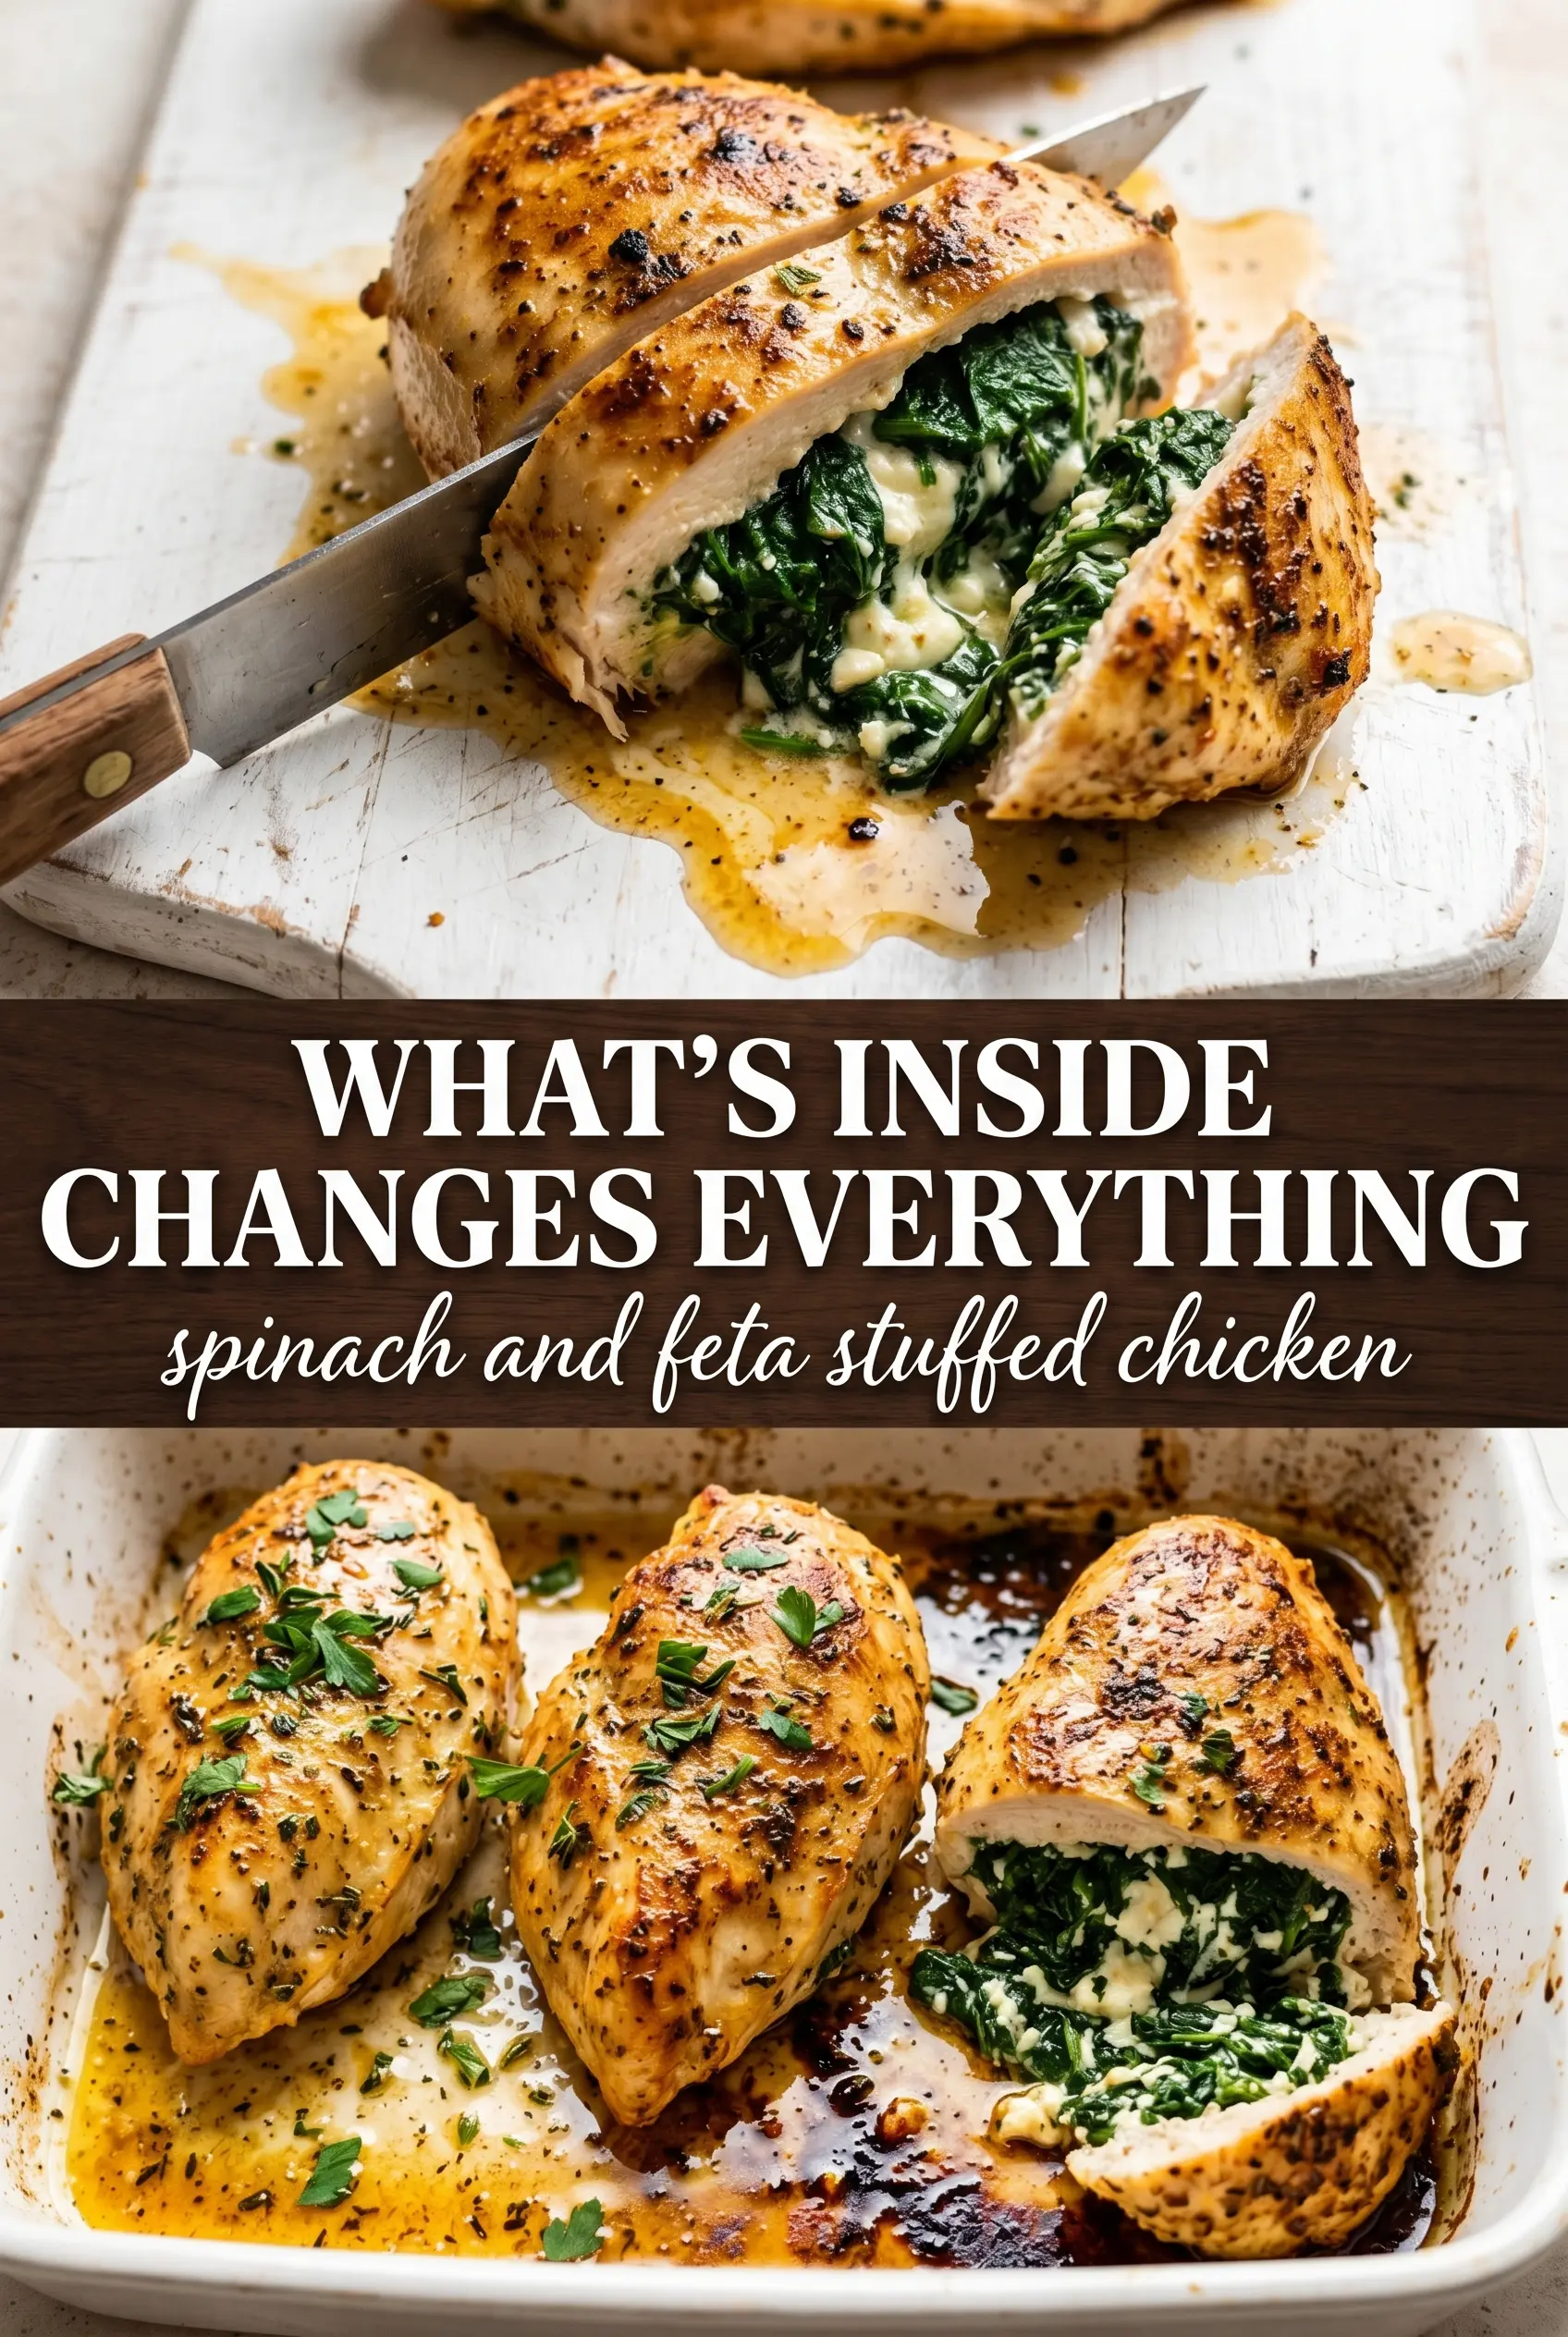
Golden, juicy chicken with a molten spinach-and-cheese center earns a permanent place in the dinner rotation for one simple reason: it looks like a special-occasion meal, but it comes together with ordinary groceries and one skillet. The outside gets a real sear before it goes into the oven, which gives the chicken color and keeps the filling from leaking out while it bakes.
The filling matters here. Cream cheese gives you body, mozzarella brings the stretch, and the chopped sun-dried tomatoes cut through the richness with a sweet, tangy bite. A pocket cut deep enough to hold plenty of filling, but not so deep that it splits, is what keeps the whole thing neat enough to slice at the table.
Below, I’ll show you how to keep the chicken from drying out, how to pack the pockets without overstuffing them, and a few swaps that still give you that same creamy, savory center.
The filling stayed creamy and didn’t leak out, and the chicken was done perfectly after the sear and bake. I added a little extra sun-dried tomato on top and it came out gorgeous.
Save this spinach stuffed chicken breasts recipe for the night you want a creamy, seared chicken dinner with a clean slice and a glossy cheese filling.
The Pocket Cut That Keeps the Filling Where It Belongs
The biggest mistake with stuffed chicken is cutting the pocket too shallow. You end up with a tiny cavity, and the filling gets pushed out the moment the chicken tightens in the pan. A deep horizontal pocket gives you enough space for a generous spoonful of filling without slicing the breast into two pieces.
The other thing that matters is the sear. That first blast of heat sets the outside before the oven finish, which helps the filling stay tucked in and gives you that caramelized crust in the photo. If the skillet isn’t hot enough, the chicken steams in its own moisture instead of browning.
- Chicken breasts — Use boneless, skinless breasts that are similar in size so they finish at the same time. If one side is much thicker, pound the thick end slightly so the pocket cooks evenly.
- Toothpicks — These are not optional. They hold the seam closed while the cheese softens, and you’ll remove them after the rest. Soak wooden toothpicks in water for 10 minutes if you’re worried about scorching.
- Oven-safe skillet — Cast iron or another heavy pan gives the best sear and can go straight into the oven. If you use a regular skillet, transfer the chicken to a baking dish after browning.
What Each Ingredient Is Actually Doing in the Filling
- Cream cheese — This is the base that holds everything together and turns into that molten center. Full-fat cream cheese gives the smoothest texture; reduced-fat works, but the filling won’t be as rich or as stable.
- Fresh baby spinach — Fresh spinach keeps the filling bright and clean-tasting. Chop it finely so it blends into the cheese instead of clumping, and if it looks wet, pat it dry first so the filling doesn’t turn loose.
- Mozzarella — This gives you stretch and helps the filling firm up as it bakes. Pre-shredded works fine here, though freshly shredded melts a little smoother.
- Sun-dried tomatoes — They add a sharp, sweet edge that keeps the filling from tasting one-note. If yours are packed in oil, drain them well and blot them so the filling doesn’t get greasy.
- Garlic and Italian seasoning — These season the filling from the inside out, which matters because the chicken itself is thick and mild. Fresh garlic gives the most punch, but jarred minced garlic will work in a pinch.
Seared First, Baked Second: The Part That Makes the Chicken Stay Juicy
Mixing the filling
Beat the softened cream cheese until it’s smooth before adding anything else. If the cream cheese is cold, you’ll get lumps that never fully disappear, and those lumps make the filling harder to pack into the chicken. Stir in the spinach, mozzarella, sun-dried tomatoes, garlic, and seasoning until the mixture looks thick and spreadable, not runny.
Cutting and stuffing the pockets
Use a sharp knife to cut a deep pocket horizontally through the thick side of each breast. Stop before you slice through the far edge, because a hole in the side is where the filling escapes. Spoon the filling in firmly, but don’t pack it until the chicken splits open; a rounded spoonful that sits just inside the seam is enough.
Getting a real sear
Heat the olive oil until it shimmers before the chicken goes in. If it goes into a lukewarm pan, it releases liquid and turns pale instead of forming that deep golden crust. Sear for 3 to 4 minutes per side and don’t move it around; the chicken will release more cleanly once it has browned.
Finishing in the oven
Move the skillet to the oven and bake until the thickest part of the chicken reaches 165°F. Pull it as soon as it hits temperature, because the carryover heat finishes the center while keeping the meat tender. Let it rest for 5 minutes before cutting so the filling stays put instead of spilling onto the board.
How to Adapt This When You Need a Different Kind of Dinner
Dairy-Free Version
Use a dairy-free cream cheese and a good melting plant-based cheese in place of the mozzarella. The filling will still be creamy, but it won’t stretch quite the same way, so keep the rest time intact or it may spread when sliced.
Low-Carb and Keto
This recipe already fits low-carb cooking well as written. Serve it with roasted asparagus, a simple salad, or cauliflower mash instead of a starch, and you still get a hearty plate without changing the chicken at all.
What to Use Instead of Sun-Dried Tomatoes
Chopped roasted red peppers work if you want a milder, sweeter filling. They add color and moisture, but they don’t bring the same tang, so add a pinch more salt or a tiny splash of lemon juice to keep the filling lively.
Making It Ahead for Company
You can stuff and season the chicken up to 24 hours ahead. Keep it covered in the refrigerator, then sear and bake just before serving so the crust stays crisp and the filling stays creamy instead of settling out.
Storage and Reheating
- Refrigerator: Store leftovers for up to 3 days. The chicken stays moist, though the filling firms up a bit once chilled.
- Freezer: It freezes, but the cream cheese filling can turn slightly grainy after thawing. For the best result, freeze cooked portions tightly wrapped and thaw overnight in the refrigerator.
- Reheating: Reheat covered in a 325°F oven until warmed through. The common mistake is blasting it in the microwave, which makes the chicken rubbery and can make the filling split.
Questions I Get Asked About This Recipe
Spinach Stuffed Chicken Breasts
Ingredients
Equipment
Method
- Preheat oven to 400°F to set up for baking the stuffed chicken.
- In a bowl, beat together cream cheese, fresh baby spinach, shredded mozzarella cheese, sun-dried tomatoes, garlic, Italian seasoning, salt, and pepper until combined.
- Cut a deep horizontal pocket in each boneless skinless chicken breast, being careful not to cut all the way through.
- Season inside and out generously with salt, pepper, garlic powder, Italian seasoning, and smoked paprika.
- Spoon the spinach cream cheese filling into each pocket.
- Secure each pocket with 2-3 toothpicks.
- Heat olive oil in an oven-safe skillet over medium-high heat until shimmering.
- Sear stuffed chicken for 3-4 minutes per side until golden.
- Transfer the skillet to the oven and bake for 18-22 minutes until internal temperature reaches 165°F.
- Remove toothpicks, rest the chicken for 5 minutes, then slice and serve.