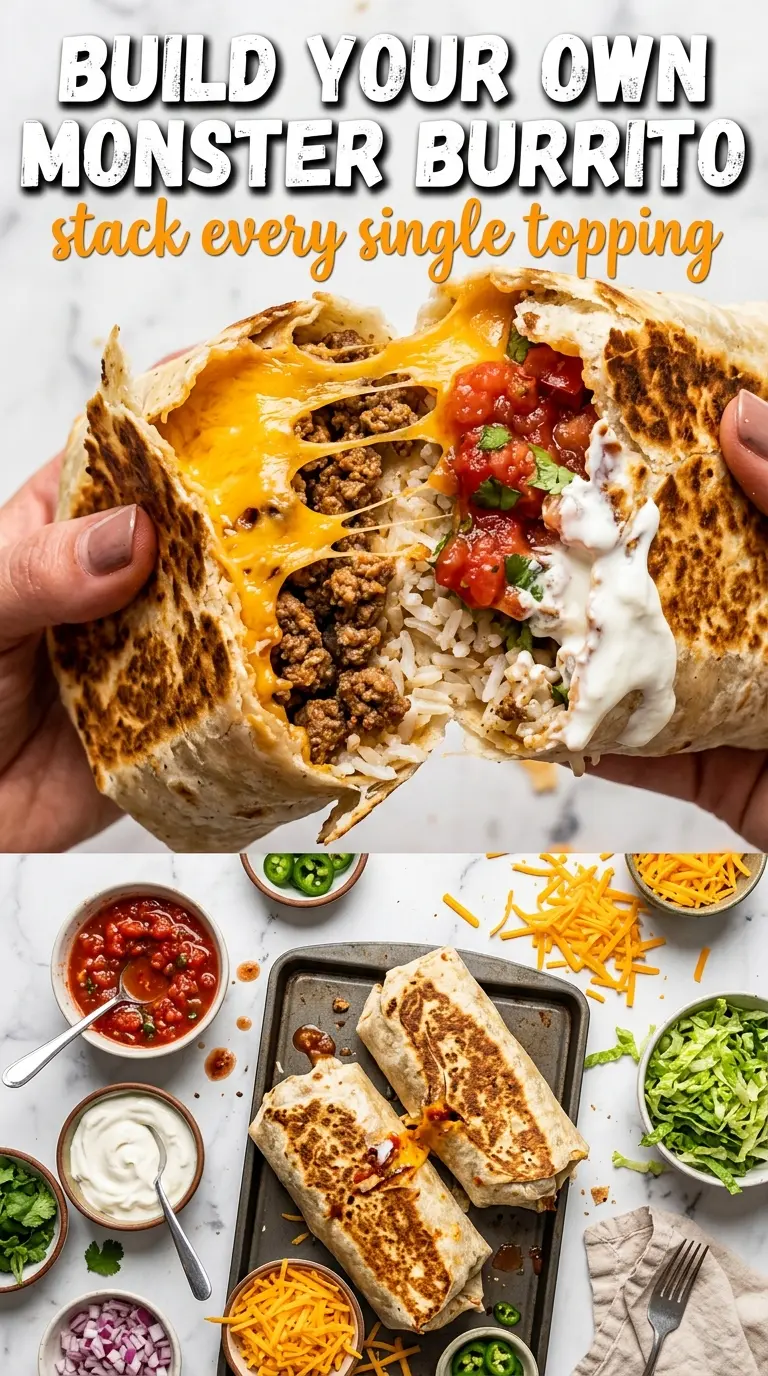
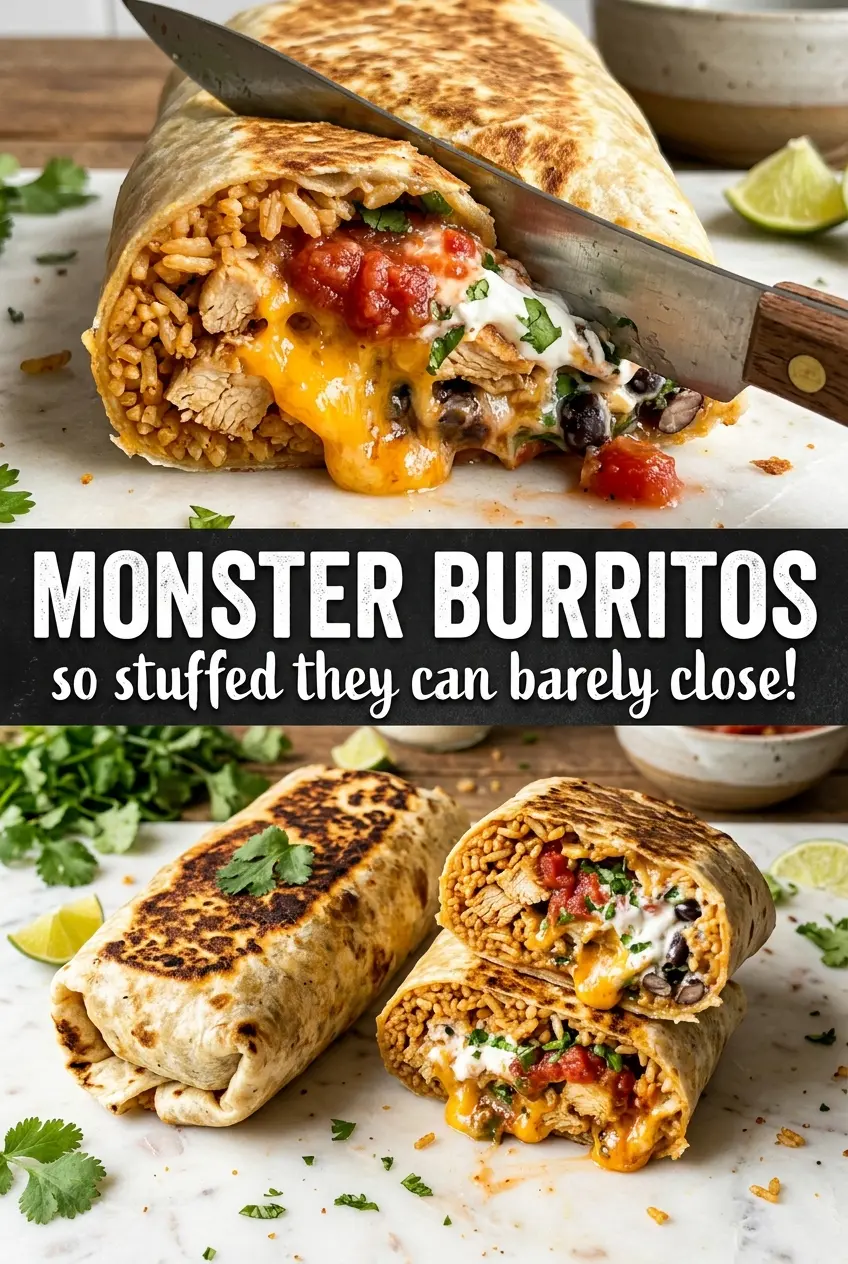
Monster burritos hit that sweet spot between a handheld meal and a full-on griddle feast. The tortilla gets crisp and lightly blistered on the outside, then you cut into it and find a stacked center of beef, eggs, beans, rice, cheese, and salsa that actually holds together instead of spilling out in a sad pile. That first slice is part of the fun, and this version is built to give you clean layers and enough structure to eat without chasing fillings across the plate.
The trick is in the order and the heat. Warm tortillas first so they fold without cracking. Keep the fillings warm, but not soupy, because excess moisture is what turns a burrito into a leak. A quick finish seam-side down on the griddle seals everything in and gives you that golden crust that makes these taste like they came off a diner flattop.
Below you’ll find the layering order that keeps the burritos tight, plus a few smart swaps if you want to change the fillings without losing the oversized, cross-section look that makes them so good.
The burritos held together perfectly after the seam-side-down finish, and the eggs stayed fluffy instead of turning rubbery. We cut one in half and the layers looked just like the photo.
Save these monster burritos for the griddle nights when you want a huge, crisp-edged burrito with a real cross-section.
The Filling Ratio That Keeps a Burrito from Splitting
The mistake with giant burritos is trying to stuff them like a sandwich. That extra pressure pushes the tortilla thin at the seams, and the first bite opens everything up. You need enough filling to make the burrito feel loaded, but not so much that the tortilla has to stretch to its limit.
Rice and beans do more than add bulk here. They act like anchors that trap the beef and eggs in place, and they soak up some of the salsa so the center stays thick instead of slippery. If your burrito keeps tearing, the fillings are probably too hot and wet, or you’re piling them too close to the edges.
- Extra-large flour tortillas — Use the biggest tortillas you can find. Smaller ones can work, but they force a tighter roll and leave you with more seams to fight.
- Refried beans — These give the burrito body and help hold the layers together. If yours are stiff, loosen them with a spoonful of water or broth so they spread without tearing the tortilla.
- Salsa — Spoon it lightly. Too much salsa turns the center soggy fast. If you want more sauciness, serve extra on the side instead of loading it all inside.
- Ground beef — This is your main seasoning backbone. Drain off excess grease after browning so the burrito doesn’t get greasy and slide apart when you roll it.
Building the Stack Without Soggy Spots
- Eggs — Scramble them until just set and fluffy. Overcooked eggs dry out and get rubbery after the burrito hits the griddle a second time.
- Shredded cheese — Choose a melting cheese with some stretch, like cheddar or a Mexican blend. It helps glue the filling together once the burrito is rolled and heated.
- Guacamole and sour cream — Use these as finishing layers or on the side. Inside the burrito, too much of either can make the roll slippery and harder to seal.
- Diced onions and jalapeños — Keep these small and even so they don’t poke through the tortilla. Raw onion brings crunch; jalapeños bring heat without adding moisture.
The Griddle Finish That Seals the Roll
Cooking the Beef First
Brown the beef on the griddle until it loses its pink color and starts picking up some browned edges. Then drain off the excess fat if needed and season it while it’s still hot so the taco seasoning clings to the meat. If the pan is crowded, the beef will steam instead of browning, and that softer texture doesn’t give you the same sturdy filling.
Scrambling the Eggs
Push the eggs onto a cooler part of the griddle and stir them gently until they’re just set and still soft. You want fluffy curds, not dry crumbles, because the eggs will cook a little more once they’re inside the burrito. Pull them off the heat the moment they look mostly done.
Warming and Rolling
Warm each tortilla until it bends easily without cracking. Layer the fillings in the center, leaving a clean border on all sides, then fold in the sides before rolling it up tightly from the bottom. If the tortilla splits, it was either too cold or overloaded, and the only fix is to build a smaller burrito.
Seam-Side Down for the Crisp
Set the burritos seam-side down on the griddle and let them cook until the underside is deeply golden. Flip once and finish the second side just long enough to crisp it through. This final step does two jobs at once: it seals the roll and gives you that toasted, crunchy exterior that makes the whole thing worth slicing open.
How to Adapt These Burritos for Different Cravings
Make it vegetarian with black beans and peppers
Swap the beef for seasoned black beans and sautéed peppers or mushrooms. You lose the meaty chew, but you gain a softer, earthier filling that still holds together well if you keep the moisture under control.
Go dairy-free by skipping the cheese and sour cream
Leave out the cheese and sour cream, then add extra guacamole or a thick avocado mash for richness. The burrito will be a little less creamy and less sealed inside, so keep the fillings tighter and the griddle finish a touch longer.
Make them breakfast-style with potatoes
Replace the rice with crispy breakfast potatoes or hash browns. That gives you a more classic breakfast burrito feel and adds crunch, but the potatoes need to be browned and drained well or they’ll make the tortilla greasy.
Storage and Reheating
- Refrigerator: Store wrapped burritos for up to 3 days. The tortilla softens a bit in the fridge, but the griddle finish helps bring some of that texture back.
- Freezer: These freeze well if you wrap them tightly in foil and freeze without the salsa or sour cream inside. Add those fresh after reheating for the best texture.
- Reheating: Thaw in the fridge if frozen, then warm in a skillet or on a griddle over medium-low heat until hot in the center and crisp outside. Microwaving alone makes the tortilla chewy, so use it only to start the heating before crisping in a pan.
Answers to the Questions Worth Asking
Monster Burritos
Ingredients
Equipment
Method
- Heat a griddle to medium-high heat and cook the ground beef until browned, breaking it up as it cooks. Stir in the taco seasoning according to the packet directions and let it cook just until the meat is evenly coated.
- On the same griddle, scramble the eggs over medium heat until fluffy and just set, then set aside.
- Warm the flour tortillas on the griddle for 15-30 seconds each until pliable, then move them to a work surface.
- Layer each tortilla with refried beans, cooked rice, seasoned beef, scrambled eggs, shredded cheese, salsa, and your desired toppings like diced onions and jalapeños, guacamole, sour cream, and hot sauce.
- Fold in the sides and roll tightly into burritos, then place seam-side down on the griddle.
- Cook burritos for 2-3 minutes per side on the griddle until golden and crispy.
- Slice each burrito in half and serve, showing the layered cross-section.